Showing posts with label DIY. Show all posts

Saturday, April 2, 2016

DIY Collage Planet

I did some collage work today, for the first time in such a long time, and it was so fun! And what started out as just playing with strips of paper and scissors become something that I actually really like! I thought it would be something abstract and oceanic, just some meditative cutting and gluing. But once I trimmed the edges and stood back it became a planet! It made me kind if miss my Fiddleheads For Fiona Etsy shop, because I think other people might like it too. So since I can't post this there, I'll post it here.
And since I won't be selling these guys, at least not anytime soon, I'll just tell you all how to make them instead. All it takes is a round base of some kind, a plain old glue stick, some paper, and some scissors. And if you have an exacto knife and a cutting mat that would probably help at the end, but scissors would probably work. For a base I used this, and I get decorative papers from here, but there are lots of sources.

Just choose some papers you like the look of together, cut them into strips, and glue them down in layers. Then trim around the edge of your circle with a knife or a pair of scissors to trim the papers that are hanging over.  If you do have the cutting mat, flip your planet face down and cut around your base. Otherwise, just do your best with scissors.
always forget, but really should always remember, that it is so creatively renewing and restorative to work in another medium for a change. As I sat staring vacantly at my Instagram feed in the middle of the day, for the millionth time, I realized that I desperately needed to put my phone down and do something before my brain turned to mush! And I'm so glad I did.

Tuesday, February 4, 2014

Paper Mosaic Collage: A Kid Friendly Art Project

I've had this idea stewing around in my head for some time now, and I finally got a chance to try it out.  Emmett can sometimes be hard to rope into craft projects because he gets frustrated easily if things are too hard or finicky.  But this project includes some super kid friendly tasks, even preschool friendly, like paper snipping and glue sticking.  It also includes some things that an adult or older child will need to do too, so it is a great group project.  

Here is what you will need: 
1) Some large thin white paper, like children's easel paper, or butcher paper
2) Various papers to make up the body of your collage, such as wrapping paper, decorative paper, scrapbooking paper, or whatever you choose.
3) Something to mount your collage on, such as this wooden art board, poster board, foam board, or whatever you have access too. (click on the link above to see where mine came from)
4) Something to use as your background, if you want one.  I used book pages, but you could paint the background, or use whatever appeals to you.
4) A pencil
5) Gluesticks
6) Kids scissors
7) Good grown up scissors, or an exacto knife and cutting mat.
The first step is to get the kid or kids snipping paper into small pieces into a bowl.  I found that Emmett had an easier time with this if I first cut the papers into long strips for him, and then he could easily snip them into something like squares.  There is no need for them to be a uniform size or shape.
And while he was busy snipping I pulled up some images of whales on Google images to use as a basis for our whale shape.  In hindsight it would have been a better idea to do this in advance.  Especially if you will be working with more than one kid.  Emmett and I together decided that the image below both appealed to him and fit well on the mounting board we had on hand.
So I sketched out the outline of this humpback whale on a piece of paper I snagged from Emmett's easel.  The paper (and the outline drawing) must be the size of the design you will want to end up with on your final collage.  You want the drawing to be as detailed as you can, although the outline is all you need, so you don't end up with an unrecognizable blob, so pay attention to the silhouette and make sure it is clearly the animal you are trying to make. 
Then you want to flip the paper over and make a more vague outline that surrounds your whole design.  This is the side you will glue the paper scraps too, and you want to make sure that they will cover every inch of the design on the other side.  This sounds really confusing, and is a little hard to describe, but it is very easy to do.  The next photo will hopefully give you a better idea what I am saying.
See how the outer line is less detailed but contains the whole more detailed silhouette within its borders?  That's what you want.  Now you are ready to start gluing, and hopefully the kiddos have lots of snipped paper scraps in their bowl. 
Make sure you have the larger, more amorphous side up, and let your little gluers get to work.  They can work as methodically or as willy nilly as they want, it will look cool either way.  I have some of the purple glue sticks which are great for kids because they can see where they have put the glue, and yet it still dries clear.
And just keep adding and adding paper scraps until you cover up all of the white paper up to the edges of your pencil border.  It's ok if there are overlapping papers, in fact, there will need to be, so don't worry too much about lining anything up.  Emmett got a little bored before all of the last little bits of white were covered, so I finished it up for him by filling in all of the tiny remaining gaps and then adding more glue to any of the scraps that weren't securely glued.
 When this stage is all done it will look like this. (above)
Once the glue has dried, or mostly dried, you flip over your paper, revealing the more exact drawing on the flip side, and get ready to cut it out, either with good sharp scissors or an exacto knife and cutting mat. Cut slowly, being sure to cut through all of the layers of glued paper scraps.
And now the fun part! You flip it over and see the mosaic pattern animal silhouette with nice clean edges:
And now for the background.
I could have just given Emmett a whole bunch of blue paints and let him go at it on the wood panel. That would have probably looked really cool too.
But since Emmett's attention was waning, and book pages are kind of my thing, and I knew I happened to have some pages from an old copy of The Old Man and the Sea lying around, I decided to go that way instead.
Now just slather the back of your whale (or other animal) with glue stick, flip it over and place it on your background and press down all the edges firmly.
The wood panel I used was from Dick Blick, and they come in loads of sizes.  The added bonus of using a wood panel is that you can attach a picture hanger right on the back of it and you don't have to worry about either finding a frame, or figuring out how you are going to get it to hang on the wall.
And you're done!  Emmett is 4, so by the end of this project I was pretty much working on it alone. And this is also a pretty big piece. But I bet with 7 or 8 year olds they would be able to see it through all the way to the end, as well as be able to take on a lot of the aspects that I did, like the background and cutting out the final silhouette.

Have fun!


Monday, November 4, 2013

Emmett's New Reading Corner

We have been continuing to put together Emmett's new room, and this weekend we finally got to put up the picture ledges for his books in his reading corner. The design concept behind this idea was both aesthetic and practical.  On the practical side, he has trouble putting his books away on a tight bookshelf, squeezing the books between each other and making space can be very frustrating.  So this way I thought it would be a snap for him to be able to pick up his books and put them away. (wishful thinking? quite possibly) Also, I think they look cool, visually striking, and it gets the point across about what the space is for.  It is also a great way to fill up a big wall, and if you are light on big pieces of art, and heavy on books like we are, it is a great way to fill the space.
And I think the fact that Emmett was really excited to help us put his books up on his new shelves is a good sign for their appeal and functionality.
I'm starting to feel really glad that we went with very minimalist and soft colors, like grey, white and a little yellow for our basic design scheme for his room.  As soon as he started adding his own things, like his books, games, puzzles and toys the room is suddenly filled with a fiesta of primary colors.  If we had done the room with wild patterns and paint colors I wouldn't be able to stay in there for more than 30 seconds.  This way it will keep the room feeling a little more calm and restful.  Oh, and in case you are curious, the triangles on the walls are decals from urbanwalls on Etsy. They couldn't have been easier to apply, Emmett even helped, and I love the effect.  And since I used a random pattern I didn't have to worry about lining anything up.

So it's not done yet, we still have to get the right rugs and bedding, lighting and bedside tables.  But he is very psyched about his new room, and I think we'll move him in there next weekend.  Next project: the redesign of Emmett's old room for the new baby!  And I think we'll continue the soft color theme in there as well.  Sometimes there is just something so nice about white. . .

Tuesday, September 10, 2013

The Elusive White Background

As a jeweler, and I bet this happens to all types of crafters, I am often asked for photos of my work on a white background.  But as an amateur photographer this is often one of the hardest types of shot to achieve.  The white never looks white in the picture, even if to the naked eye the set up looks clearly white.  It always looks grey, or pink, or yellow, and often the surface isn't uniform, with lots of shadows and just generally other troubles.  So for years I have been trying to figure out how to do this.  And I need to do it at home, without a professionally lit studio and thousands of dollars of equipment.  So I have scoured the internet looking for clues and cobbled together a set up.  And if you want to start doing the same the Etsy Blog is a great place to start reading.  

So let me give you a heads up that my photo set up is really nothing to look at.  It is almost hilariously low budget.  So much so that last time I was taking photos I thought that the set up itself, nestled around strewn toys and and Ikea tent in our playroom, really needed immortalizing.   So let me first show you one of the photos I took in the middle of that mess so you won't close this window without reading any further.
 Not too bad, right?  Ok, so here is the set up.  Note the mostly eaten bag of jelly beans in the right hand side of the top photo.  These white background photos were fueled primarily by jelly beans.
 Ok, so what you want is bright, but diffused natural light and a seamless background.  So I found the sunniest spot in our house, which happens to be the playroom.  I placed some clean white poster board on a table and propped it up on that kiddo bench so that it made a gentle arc up from horizontal to vertical. Then to diffuse the sun I taped up some white tissue paper, which lets through most of the light but eliminates sharp shadows.
Doesn't that look nice?  Of course I don't have any unused tissue, so this came from a recent online purchase.  I'm very eco-conscious.  Yeah, that's it.
 It is also very helpful to have a tripod so that you can open up the aperture on your camera to let in the most possible amount of light before the item itself gets too washed out.   The sun had moved a bit by the time I took pictures of the set up, so originally the sun was directly on the poster board without any bright or dark spots.  Here are a few of the other pieces I shot that day.  I have had to play with them a little in Photoshop, but there is only so much you can do in Photoshop, so you really need to start out with an original photo that is pretty close to how you want it to look in the end.
Although I am absolutely no expert I am happy to answer questions if you have any.  Just leave them in the comments or get in touch directly through one of the contact options on the right.  And to see more jewelry photos you can head over to my website, or to see collage product shots you can head over to my Etsy shop here.  Happy shooting!


Tuesday, January 15, 2013

Our Bedroom in the Barn: Before and After

You know how when you move into a new place, you only have so much time, money and energy to fix it up exactly the way you want?  And then you get the the point where one or all of those things run out, and you're done?  Well that happened to us with our bedroom.  I've been wanting to do a bedroom before and after post for, well, 4 years, but we only just got to the "after" part!  Here's a decent "before" picture.
 We moved into this barn about 4 years ago, and we refinished the floor, painted the walls Iron Mountain (Benjamin Moore), framed and hung some art we really love, repainted a great bed frame from Ikea. . . and then we ran out of money and motivation.  We got really stuck finding a 9x12 rug we liked and could also afford.  So we borrowed an old oriental rug from my parents attic that was the right size, if not the right style and colors, had a baby, and now it is 4 years later.

A confluence of two things got me motivated again.
 
One: Recently my good friend Cara bought a house in Brooklyn and asked me and a couple of other friends to put together a couple of decorating inspiration boards on Pinterest, and that really got me going again.  Looking at all of the beautiful homes and great creative decor styles made me really start to look at our space again, and get the jump start I needed to tackle the final details.  I decided that what our super modern, minimalist bedroom really needed to make it more cozy was a little bit of boho pattern and texture.

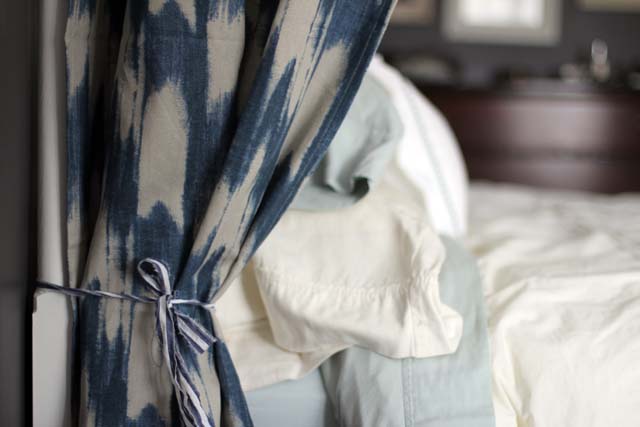
Two: Our bedroom is really drafty, and the one heat vent in the ceiling blows right on TH's side of the bed and drives him crazy.  So you know what is cheaper, and awesomer, than moving a heating vent?  Bed curtains.  I have always harbored a secret desire for a super princess-y bed, and this idea really jived with that.  How often can you find a really practical reason to give yourself a super romantic princess bed?  Just the once, in my life so far.  So here it is! Our finished bedroom:
Ok, so of course it's not totally finished.  I still need to get that little loveseat recovered in a fun boho fabric, which is still TBD.
 I tied the curtains on with pieces of white grosgrain ribbon, which was very inexpensive, and won't fray.
We found this great 9x12 rug for very little money at West Elm, along with the curtains, actually.  They are having a great sale. Thanks West Elm!
I also have plans to make some throw pillows of various sizes from block printed Indian fabrics in rich and slightly clashy colors and patterns.  But when? Hopefully soon.
The cozy cave the the bed curtains make has proven to be a much approved of place to read books by the three year old set.  And TH wakes up in the morning with no more muttering about why the heat system insists on blowing cold air on him all night.  And I have my princess bed, and can pretend I am a character in a Jane Austen novel, which for some reason makes me feel right at home ;)

Win, win, win.  Three thumbs up from the family.

Monday, December 24, 2012

Merry Christmas From Campestral And A Joyful DIY!

 Happy Christmas Eve everyone!  I have already had my post-Christmas-busy-season-crash, which was marked by almost one full day of sitting around in my pajamas and staring at the wall.  I also managed to squeeze in a quick cold too, and now I'm back on my feet and ready to take on some much ignored (not so fun) life administration and (fun) projects.  Here is a quick little holiday decorating DIY that is simple and quick enough to do with little helpers, as long as you keep them away from the X-Acto knife.  Here is what you'll need:
 You could actually just use scissors instead, if you want to make it more kid-friendly.  And the paper is a sheet of card stock with a layer of book pages glue-sticked to each side.  If you want to be holiday appropriate you could use a sheet of Christmas carolling music, or a holiday themed book.  
 Now just write your letters on your glued book page paper.  You can do any word you want, or you could do your family members' initials, or 2012, or 2013, or anything that grabs you.  And you can get the kiddos involved here.  Mine was very helpful.
   Next you are going to cut out your letters, either with scissors or with your Ex-Acto like so:
Now if you want to be neat about it you can erase all of the pencil marks from around the edge of your letters.  It took me two tries to write a decent J, so I had to do some erasing.
Now all that is left is punching a hole, or poking a hole with a thumbtack or nail, and stringing through a loop of some kind of string to hang them with.  You could also hook them on one long piece of cord together to make a garland to hang on your mantel or in a doorway.  And you're done!
Merry Christmas and Happy Holidays to all of you out there, and may your days be merry and bright!